Monday, April 16, 2012

Now That's A Bright Idea...

...To finally have our electrician back out to the house to install new light fixtures and receptacles! We've been pondering the electrical situation at our house since we moved in--ie: "Should there be a plug here?", "Oh, it would be so nice to have a plug in this hallway", "Do we REALLY want to mount our TV over the fireplace", etc. So after living with our house's electrical system for 2 years (other than having all of our plugs updated to GFCI, which grounds and protects from electric shock), we were finally ready to forge ahead with some electrical updates. But we are glad that we lived with the current state of things for a while to really be sure what updates we wanted done, since we changed our minds several times in the planning process.

First up for an electrical update was the downstairs half bath that we have been working to finish. The lighting in this bathroom was pretty par for the course with the rest of the house--outdated.


Worst part about this fixture was that it didn't even have a wall switch--just a pull-on chain!


I personally think it kind of looks like an astronaut helmet.


Here's an in-progress shot with the old light removed and a hole cut in the wall for our new wall switch.


But now, we have a prettly little fixture in an oil rubbed bronze finish brightening the space.


The new switch has a receptacle in it...extra fancy.


The glass shade has little air bubbles in it that cast a fun shadow on the ceiling when the light is on.


Next up were new plugs in several places...

The kitchen--before now, we had no receptacles at countertop height. NO RECEPTACLES AT COUNTERTOP HEIGHT, people!! Sometimes we just laugh at the oddities of our home.


So now we have one! We are going to eventually completely redo the kitchen, so we didn't want to spend a ton of money installing new receptacles. After 2 years with no plugs, we are just so glad to have one!


And a new one in the downstairs hallway. There were no outlets in our upstairs or downstairs hallways before now (and there are still none in the upstairs hallway--it's on our list for the next phase of electrical updates).


And here is a rare shot with my back to the main entry looking down our hallway (the new receptacle is at the end of the hallway). Again, we just have to laugh sometimes at how many projects we have going on around here. That hallway light will also be included in electrical update phase 2!


Our electrician installed a receptacle in the floor of our living room. Floor receptacles, how I love thee! They provide such a great way to hide ugly cords in living rooms where you have side tables but don't want to run cords across the room to a wall. And I didn't realize floor receptacles had come so far (or maybe they've always been this way and I just never noticed), but the receptacle is sunken down so you can cover it and the cord with your rug if need be. 


Temporary lamp (and temporary chair next to it) now plugged in on permanent table that will be covered in fabric (once I make a table skirt for it!).


And moving on...I finally consented to mounting the TV above the fireplace. I'm not the biggest fan, but the TV just didn't make sense anywhere else in our living room and the plan is to build some molding to enclose the TV when it's not in use. Here's hoping that actually happens! So here is our new plug for the TV (and I won't lie, I'm pretty excited about plugging Christmas lights in here, too!). Once we paint the cord cover the same blue as our walls, you won't even notice it! And the receptacle face is actually very white, although it does not come across that way in this picture.


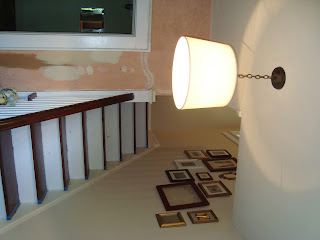
And last but most improved, we replaced our foyer fixture. Here is the before...honestly, when was this ever a good design choice?!!


We replaced it with a new oil rubbed bronze canopy and chain with a large drum shade. Much better!


It's plain white for now, until I get the itching to cover it with a fabric once things get a little more finished in this space!


So that's all for now...orange you glad we didn't do everything in one phase and make this post longer than it already is? For any locals, we have been really happy with our electrician and enjoy working with him. His website is http://vernonmoyerelectric.com/. We are glad to bring in a professional when it comes to electrical work--that's defintely something we don't want to DIY!


Wednesday, April 11, 2012

Pretty In Pink

Since buying our house 2 years ago tomorrow (!!!), we admittedly haven't done much to our dining room. We stripped the wallpaper in summer of 2010 as mentioned here and made/hung curtains here. We have several other projects going on in other rooms of the house and are trying to wrap those up before opening any new cans of worms. But...since I had a 4 day Easter weekend I decided to undertake a mini project. Behold, our dining room built-in.


I've been telling Stuart for months now that I really wanted to paint the inside a fun color. The previous owners stained the original wood a mahogany and it was just so dark. Something that holds china and crystal should be a little perkier, no?


Ultimately, this room is going to be the same Bone White that we painted our upstairs hallway (which is really a beige and will also be the color of our downstairs hallway once we get around to it) to tie some of the spaces of our house together. Our living room is blue and you can see the foyer/hallway as well as the dining room from the living room. So we are thinking that if those two areas are the same color it will tie spaces together with the living room as their connector. Are you with me?


That being said, we (I) wanted a fun color that would pop in the dining room once it is painted Bone White. So I looked to our existing curtains for some color inspiration. Basically the options for the cabinet based on the curtain colors were green, a goldenrod-y color, or pink. I didn't care for the goldenrod--not enough pop against the soon to be Bone White. And the room is currently green, so that would be no fun. So ding ding ding, pink was the winner!


We cleared out the cabinet and wiped 'er down. Don't you love that original beadboard detail?


Who knew all of this could fit in that tiny little cabinet? There are 3 more cabinets filled with china and crystal overflow--yikes!


We primed with an oil based primer. I'll be honest, oil based paint is no fun. It goes on very thick, is very smelly, and is VERY hard to remove from paint supplies and most importantly, your hands! But we went with the oil based vs. water based/latex paint to get better coverage and to prevent any of the wood stain from seeping thru. We didn't worry about painting it on too thick--just enough to cover the surface.


And ta-dah! Here she is in all her built-in perky glory. I'm don't much gravitate to pinks (or any warm colors, for that matter--I'm a cool and neutral color kind of gal), but I'm loving this unexpected pop of color.


I really like this view below with the doors closed. When the doors are open, the pink is kind of in yo' face pink, but when the doors are shut (which is how they are 99.6% of the time), the pink is a lot more subtle, yet still a fun, unexpected pop of color.


And here she is with all her goodies back inside.


Mini project complete for only $13 (the cost of the paint). Once we paint the dining room walls, we will finish out the exterior of the built-in with high gloss white to match the molding/trim/doors throughout the rest of the house. But for now, this little lady is pretty in pink and that's enough!


And PS, if the red bowl on top of the now pink cabinet bothers you like it did me, you can rest assured it has been relocated since these pictures were taken!