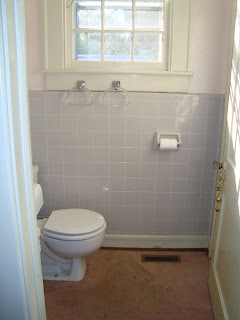
To looking like this:
Oh yes we did...we started our first big renovation project last Thursday. It all started when Stuart emailed me at work saying that he just couldn't take the bathroom door getting stuck on the carpet each time he went into the bathroom and that he was going to rip up the carpet when he got home. Fine by me--the carpet was filthy and a very unattractive mauve color. Honestly, who puts carpet in a bathroom? So before I knew it, I was so excited about the project that when I beat him home, I ripped it out myself. And, although we didn't realize it at the time, thus began our bathroom renovation. We had planned to tackle this bathroom first in the category of major renovations, since it is a very small space (20 sq ft) and there was really no way to make it worse than it already was (so we thought). We figured it's a good place to start learning some DIY skills. And learn we did...after ripping up the carpet, there was a layer of linoleum glued to some backer board.
So we went to Lowe's and bought a crow bar. It took Stuart about all of 5 minutes to rip out the floor when we got home.
Then, I googled how to remove a toilet and sink and we took those puppies out. I swear, you can do any DIY project with the help of YouTube. And our toilet and sink sat on our front porch for at least 24 hours. Just keeping it klassy 'round here.
After removing the sink and toilet, we tackled the tile. Using the same crow bar tool that we removed the floors with, we used a hammer to get the crow bar down behind the tile and then yanked/pulled/hit the tile until it all fell down.
Unfortunately, one of our plaster walls came down with the tile. It literally crumbled before our eyes. But it's alright--we have some drywall that Stuart is hanging right now!
Our plans for putting the bathroom back together include the bit of drywall I mentioned, tiling the floor, hanging beadboard on the walls with molding and a chair rail, installing new light fixture and updating electrics, reinstalling our old toilet, and installing a new sink. The room will also get a new coat of paint and new hardware.
This picture reflects some of the supplies we have purchased for the project. Our supplies include:
- 2 sheets of beadboard
- 12' of chair rail
- 12' of molding
- 12' of quarter round
- 21 sq ft of carrera marble hexagonal tile
- dry wall
- backer board to adhere tile to
- tile mortar
- tile grout
- tile sealer
- tile spacers
- trowel
- grout float
- grout sponge
- small nails
- nail filler
- new wax ring
- new toilet seat
- new toilet part (oops--we broke whatever part it is when removing the toilet)
- new toilet handle
- toilet paper holder
- towel bar
- light fixture
- marble transition piece for tile to wood floor transition
- paint (wall paint and molding high gloss paint)
- level
- multiple saws, screw drivers, wrenches, hammers, etc.


0 comments:
Post a Comment