Sunday, July 24, 2011

Sewing Table Turned Nightstand

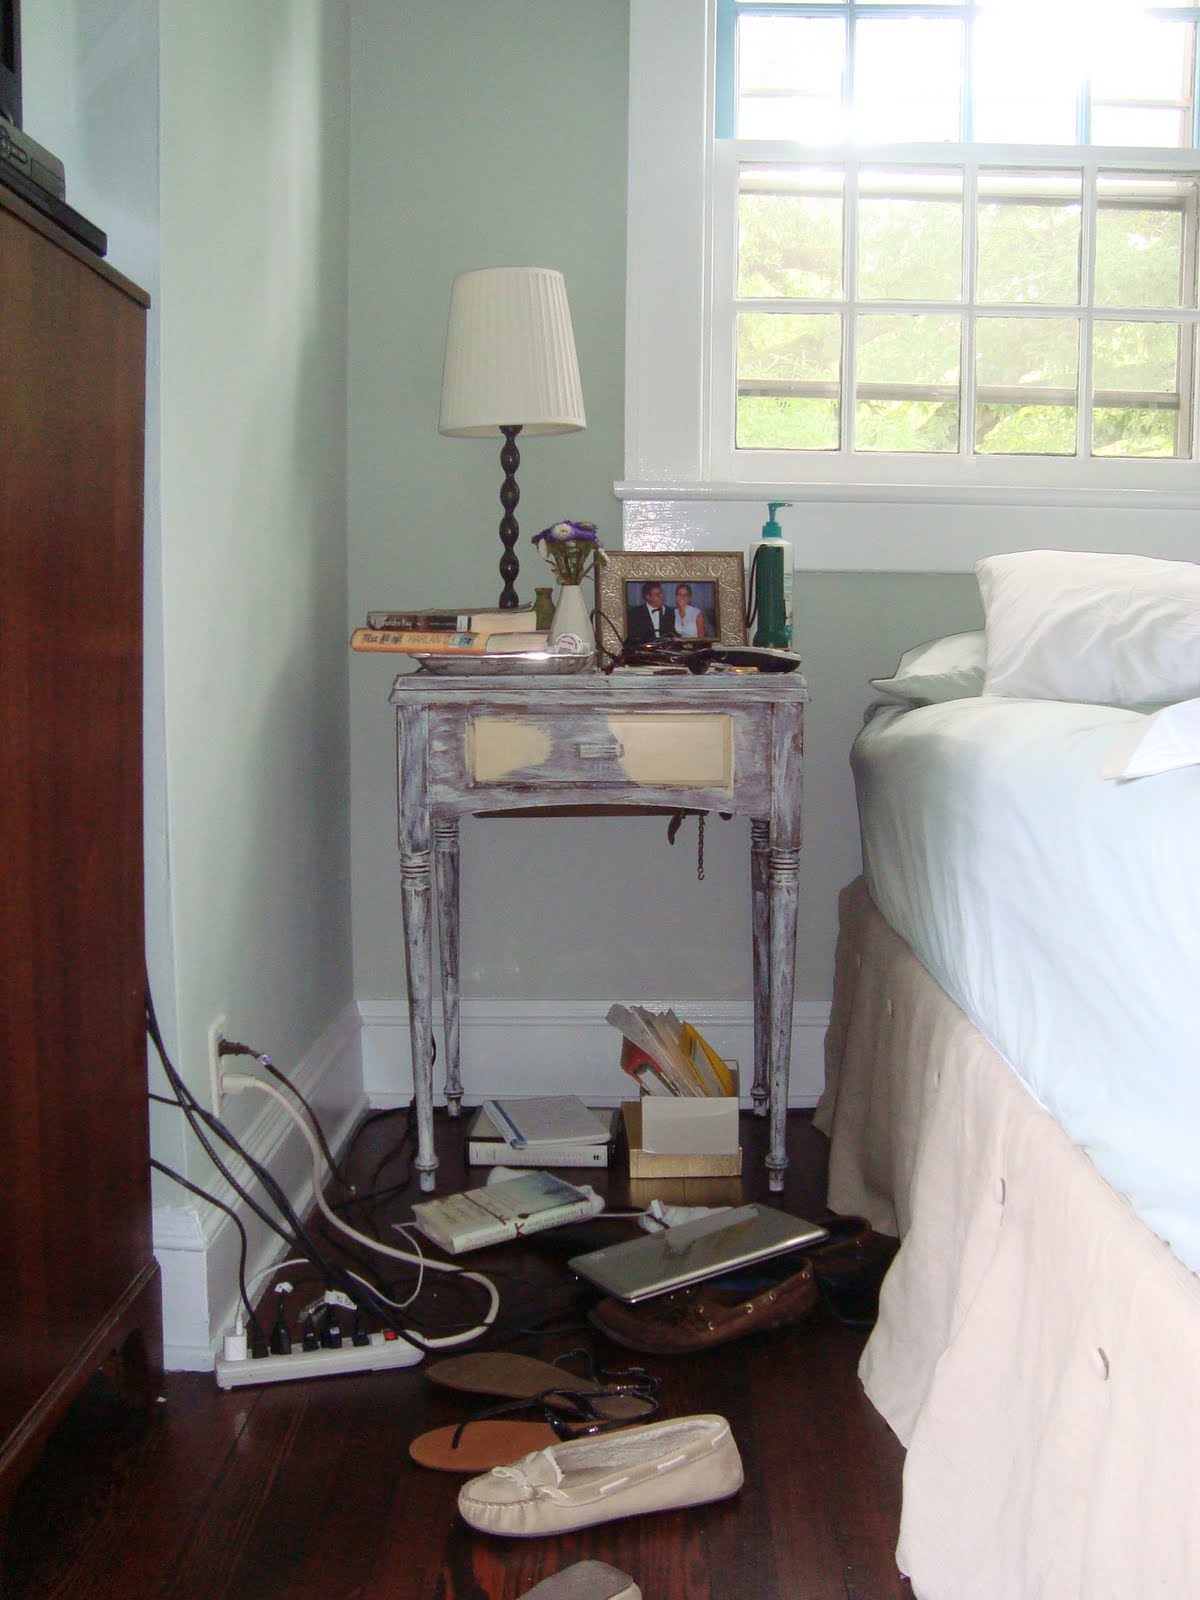
Back in December I bought an old sewing table from Habitat for about $9 (it was 1/2 off day, of course so I thought $9 down from $18 was a pretty good deal). I liked its size and thought it would make a nice nightstand for my side of the bed. The one downside? It was so ugly. It looked like the previous owner had tried to prime it and then not followed thru with painting it. Anyways, I figured for the price even if it didn't come out much improved, it wasn't too big of a loss on my part. So home with me it went! And home with me it sat for oh 8 months or so. Until last week, to be exact, when I finally worked up the motivation to mosey on over to Lowes (it's less than a mile from our house) and pick out a paint color. My paint choice was influenced by the new curtains in our bedroom that I wrote about here. I thought an orange might add a nice, unexpected pop of color against the curtains that will utimately be the backdrop behind this table (once I get the last 2 panels sewn and hung). Here is a picture of the table before it was painted (with a few sample brushstrokes of the orange before I began painting).


(And yes, my side of the bed is pretty much always this messy!)


The table was a little high for our bed, so I planned to saw a bit of the legs off after the painting was complete.


I also wasn't crazy about the pull on this drawer, so I bought 2 little knobs from Lowes to replace it.


I removed the pull and covered the holes with some wood glue that we had on hand. Then, I sanded it down to leave a nice smoothe finish.


And a shot of the table opened--obviously no sewing machine in here anymore!


So I thought I had picked a good color and I was ready to slap some paint on this lady and be done--quicky project. No siree. First off, I made the rookie mistake of not sanding it down a little before painting. I stupidly assumed that the previous owner had sanded the table and then primed it. That was not the case, so my mistake right out of the gate caused the new paint to scrape off of the piece at the slightest rub against something. I painted three coats of the new paint on her and it was still scraping off very easily. Second mistake? I picked a terrible color! I honestly don't know what/how it happened--I thought this light creamy orange would be really nice, but not so much:


Yikes!! I didn't take a picture of it next to my bed because I was so embarrassed, but the result was not good. ::sigh:: I even tried to rub some leftover stain from our floors on the orange paint to darken things up a bit, but to no avail. I had to walk away from it for about a week before I could get my butt back to Lowes to pick another color. And this color was chosen by Stuart! He is always drawn to darker colors while I stay on the lighter side, but this time I liked what he chose and thought it would work well with the new curtains. So we brought the paint home and took the table outside to sand/scrape off the old paint and start over.


And Stuart sawed off a bit of the legs before I painted--in the picture below 2 of the legs have been "trimmed" and 2 have not. We only took off about 1.5" but it made a big difference. Stuart used a jig saw but I'm sure any saw you have around the house would be just fine.


And wah-lah! The new paint color, a darker green that will look really nice once the curtains are hanging behind the table. (And yes, I cleaned up my side of the bed just for this picture!)


Here are the new knobs--they resemble the door knobs that are on each door throughout our house and I think they give the piece some added femininity.


I tried to create a feel for how the table will look with the curtains. Stuart is out of town so I didn't have anyone to hold the curtains behind the table, but you get the idea. I am thinking of adding a little skirt (most likely beige colored) to the table so that I can hide all of my bedside junk things underneath it. But for now, this girl is hitting the hay and may or may not doze off while admiring her facelifted $9 nightstand.
Saturday, July 9, 2011

Come On Over...

to my other blog--Mull Mountain House--and see the first blog post of what will be a chronicle of our mountain house building adventures! You can get there by clicking the link here or by clicking on Mull Mountain House along the righthand side of Mull Makeover.

Monday, July 4, 2011

Happy 4th!

Happy 4th of July! We are celebrating our country's independence and also walking around our house saying happy 4th to each other because we have finally finished painting the 4th room in our house (which we blogged about here). We started with the living room, then painted guest bedroom #1, then our bedroom, and now guest bedroom #2. We are so happy to be done and also glad that we only have a few more rooms and hallways to paint before we are done with picking out paint colors and taping off windows. Here are some pictures of the finished room--now we just need to add more furniture, accesories, fabrics, and wall decor and we will be done!


This picture is taken from the doorway--the chair in the corner is waiting to be painted and recovered.


The bed was in the middle of the room pretty much throughout the paint project. We are very glad to have it set up again for guests. I found this quatrefoil bedspread at TJ Maxx several months ago for $39.99--can't beat it. And the shutters behind the bed will ultimately be painted and hung on the wall (and thus will look much taller for a more dramatic affect--they are resting on the floor right now). The room is going to be accented with mustard yellow and the fabric bolt in the corner is going to be used for curtains. I got 10 yards off of Fabric.com (a great online fabric site) for $6.48/yard.


Many more changes to come! But for now, we're just enjoying putting the paint cans away.


Thursday, June 30, 2011

Operation Restoration Hardware: Part II

You may remember from this post that we removed all of the window and door hardware in our guest bedroom and stripped the paint off each piece using a crockpot and laundry detergent. While the shiny brass was a big improvement from the multi-layered painted hardware, we thought it needed a little updating. So we got a can of Aged Copper Rust-Oleum from Lowe's and went to town (is it just me or is it ironic that we wanted to update and got a paint called "Aged" Copper...). And our hardware went from looking like this:

To this:


To this (sorry, forgot to get a shot of all of the pieces, but here are a few!):


Here are some tips if you are looking to do some hardware painting:

1. Use painter's tape (works like a charm every time) to tape off any piece of the hardware that you do not want painted - like so:


2. To paint the screws (because yes, those need to get painted too!), screw them into a cardboard box so that they stand upright and give them a few coats - like so:


3. And lastly, (we didn't do this but wish we had) try to label your screws and hardware so that you know which goes where when it's time to put them back on. It will save a lot of time, trial, and error!

Have a wonderful and safe holiday weekend!

Tuesday, June 28, 2011

Guest Bedroom #2

We Mulls have been working to paint our other guest bedroom - #2, shall we name it? So as not to confuse it with the guest bedroom from this post. So #2's been getting a face lift that has been going on for, oh, about 3 months. Here is #2 when we first moved in:


Cute curtains, right? Because it didn't have any wallpaper like most of our other rooms, it sat untouched for many months. A visit from my brother got us motivated--he came for the night and rolled paint onto the walls for us. In most houses (or at least those that I've lived in), the ceiling molding, floor molding, doors, and windows are already painted white or off-white or what have you. Not in this old house. Every item I just mentioned was painted by the previous owners to match either the paint color or wallpaper in each bedroom. None the same. All different colors. So while it sure doesn't take long to roll some paint on walls, it is quite time consuming to do the rest. Here is a breakdown of everything that had to be done to get this room (and all the others in our house) painted:

-paint bedroom walls with roller (2 coats of the room color, sometimes preceded by a coat of primer but not in this room)
-tape floor off to paint toe molding
-tape ceiling off to paint ceiling molding
-paint said ceiling, toe, and shoe moldings (at least 2 coats in high gloss white)
-use trim tool to paint trim around said moldings, windows, and door frames (2 coats)
-paint windows and door frames (2 coats)
-paint actual doors (2 in this room)
-tape off window muntins (muntins are the wooden part of the window dividing each window pane...72 window panes=288 pieces of tape, yikes)
-paint window muntins and interior casings (2 coats)
-remove all tape with razor blade
-scrape any excess paint off window panes and floor

You get the point--there is a lot of work involved! Which is why this has been an ongoing, an hour here and there, project for the past few months. All that being said, we are not 100% done but here is some of our progress:


The color is a soft gray and is called Whispering Wind by Olympic. We have done more work in there since these pictures so hopefully we will be done soon--just in time for some special visitors this weekend!

Tuesday, June 21, 2011

Singing Again

Or rather, sewing again--on my Singer! I've been looking for fabric for our bedroom for many months now--fabric for curtains, pillows, a headboard, anything that I liked that would go well with our paint color. Typically I would pick the fabric first and then pull a paint color from it because that's much easier, but our dewallpapered walls from
this post so desperately needed painting that there was no time to pick fabrics beforehand. Thus, I'm just now getting around to finding some fabrics that I really like for the room. Several weeks ago I was driving home from Greenville, SC and stopped at a little fabric store called Martha's Fabrics off of I-85. I had never been there before, but they have a great selection and are priced several dollars cheaper per yard than other stores with the same fabrics. I picked up 10 yards for bedrooms curtains (7.5 feet of fabric per panel, 4 panels needed for our 2 windows) and 1 yard to make 2 pillow shams. I've made 2 panels so far and wanted to share the progress!

Here is the fabric--a fun floral with lots of great colors (including our wall color!) to bring in accents:

I essentially followed the same steps that I discussed in this post, but came across a helpful trick on another blog to get straight fabric cuts. In order to cut straight lines (which sounds easy, but it can be very hard), I rolled out my 7.5 feet for each panel on my living room floor and lined up my cut line with the edge of my rug. Since I know my rug is square and the edges are straight, I simply cut across.


The rug is directly under the right half of the fabric in this picture. And those are my super sharp sewing scissors--they have a secret hiding place in our house so they aren't accidently used to wrap presents and such. Don't want to dull the ole' sewing scissors.

So I made my cuts and sewed the panels--Smyth even helped me close up the last little bit on one panel with my needle.


Here is our naked window before getting its clothing:


And after my handyman hung the curtain rod (from Lowe's--same as our curtain rods in the other bedroom) and we attached the curtain rings (from Tuesday Morning), here is the first completed window:


The green fabric on the chair is what our pillows will be made from for our bed--just a little preview. I've said it once and I'll say it again--curtains completely change a room! I am hoping to sew the other panels this weekend, perhaps. And maybe one of these days I'll post pictures of our entire bedroom...one of these days.

Wednesday, June 1, 2011

Operation Restoration Hardware: Part I

And I'm not talking about the overpriced home store...no siree. Stuart and I have been "restoring" the hardware in our guest bedroom. Many times we had talked about how to remove the paint that the previous owners applied to all the window and door hardware throughout the house. However, neither of us had ever attempted stripping paint from hardware. So we decided our guest bedroom would be the perfect place to practice a somewhat hairbrained how to on paint removal. Hairbrained, you say? Yes--we definitely doubted the ingredients that were involved and didn't have high hopes for stripping the paint off our original door knobs and window sash locks. Here is the before picture of all the hardware from this one room:


There were multiple layers of paint on some pieces, so that made us even more doubtful of our recipe for paint removal. Get ready for it...all you need to remove this paint is a crockpot, enough water to cover all the pieces in the crock pot, and a cup of laundry detergent. No joke. We used Tide detergent, but you can use whatever you have on hand. Turn the crockpot and and let things "cook" overnight.

Here is a picture of our hardware "cooking":


Yuuum, right? And in the morning, your hardware will look like this...


Ta dah!!! Once the hardware simmered overnight, it was very easy to remove the paint off each piece with a brillo pad and a screwdriver (for scraping). We didn't even polish these--this is exactly how they looked once the paint came off. Pretty amazing, huh?

And why is this Part I, you might ask? Because while the brass is nice, I wanted a copper and have been spray painting each piece. So stay tuned for Part II and the finished product!
