Not sure why I'm so into suggestive titles these days, but this really is a post about finding balance in our master bedroom. You see, we added the framed painting of our house along with those butterfly prints that we posted about here over on my side of the bedroom (I sleep on the left side, as you're facing our bed), but all that was on Stuart's side were these little wall sconces. Not to mention there's also a dark, wooden chest of drawers on my side as well that was weighing things down.
See the nearly-bare-except-for-the-tiny-sconces wall on Stuart's side? (If you're wondering why those sconces were in such a wonky location, we THINK it was because the previous owners had their bed under them--although the house was empty when we bought it so we're not 100% sure. But you see, particularly in the winter when the trees are thinned out you can see the Blue Ridge Mountains out of the single window in our bedroom, and if the bed was under those sconces you would have been able to lay in bed and have the most perfect view...but we tried that layout and it didn't work for us, so sconces be gone!)
And this is a shot of my side with aforementioned single window before the painting was framed and the prints were redone.
Right before Christmas we decided to take those sconces down and patch over them so that we would be free to do what we wanted with that wall. You know we normally call Vernon the electrician when it comes to anything electric in our house, but Stuart was adamant that he could do this himself. He researched how to cap electrical wires and did his thing (sorry, that's seriously all I know about what he did other than that he turned off all the electricity in the house to do it--safety first!).
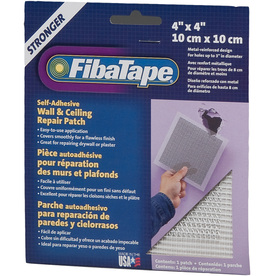
The holes left behind from the sconces were pretty large so we used an adhesive wire drywall patch to cover them. Basically, it covers the holes and provides a surface for the wet plaster patch to hold on to (the picture above gives a pretty good visual).
Here is what one of the holes looked like after we covered it with two rounds of plaster patch. And it sat like this for a good month before we got around to finishing the job. But that actually worked out for us, because in the meantime was when Vernon came to hang the light in the stairwell and while he was here he introduced us to stucco patch. Here's why that is amazing: most plaster walls, including ours, have a texture to them. The plaster patch that we had was going on smoother than our walls so you could easily spot where something had been patched, based on the texture. The stucco patch Vernon introduced us to has a lot of texture in it, and thus, blends much better with our existing walls.
So, we did another round of patchwork--this time with the stucco patch. It was tinted a sand color so you can easily see the difference between it and the first patch that we attempted. After the patch dried, we painted and then hung some pictures along the wall and all of a sudden things are starting to feel more balanced.
I got the frames at Target. I knew I wanted square frames and it took a surprisingly long while to find some that weren't super expensive. These were on sale at Target for $13 each and they hold an 8" square photo in the matte.
The frames came in this gun metal-ish finish--I'm definitely thinking that's going to change, but I'm not sure if we should go gold, oil rubbed bronze, or a combination of the two. Or something else entirely. We are open to suggestions, always!
The picture on the left is a bridal portrait, the one in the middle is empty--waiting for a good picture of Smyth & Louise to be taken for that one, and the one on the right is of Stuart and me. I'm not crazy about having large pictures of myself around our house, but I figure a few hidden in our bedroom are okay. Although I guess they aren't so hidden, since you have seen them now. Really they are just placeholders until we have some Mull babies and then I certainly won't be embarrassed to parade their pictures around our house!
And #thisisreallife, our bedding is in the wash right now and it's dark outside = poor lighting, but I really wanted to get this post up tonight. This is the only shot I can get (any further away and I'm backed into the hallway) so you can get an idea without actually being here of how these three large frames start to balance things out with the other side of the room.
Things are really coming along in this room--below is an update from the to-do list we posted here:
-install bamboo blinds on the 3 windows
-buy a white coverlet (instead of using a down insert at the
foot of our bed)
-make pillows (already have the inserts + fabric, just need to
get sewing!)
-DIY an upholstered headboard
-paint the ceiling (white, it just needs a fresh coat)
-possibly make runners for our bedside tables
Hmmmm, what to start on next?
Have you entered the Fine Lines Art & Design giveaway yet? If not,
you've still got one more hour so enter now by clicking the picture below
and following the instructions in the giveaway post!


0 comments:
Post a Comment